A Tesla wrap design starts with a visual idea, but the result depends on where that artwork lands on the car. Choose the exact vehicle template, establish a simple composition, and inspect it in 3D before adding fine detail. Then check the exported PNG separately from the editable design.
This guide walks through that process for digital wraps used in Tesla Paint Shop. It does not cover physical vinyl installation or provide cut files. The design workflow is an editorial recommendation based on our project knowledge base and Tesla's published custom-wrap instructions; it is not a tested vehicle-import case study.
Design workflow
- Match the template to the vehicle variant before placing artwork.
- Set the base color and main graphic before adding lettering or texture.
- Inspect both sides, front, rear and overhead views in a matching preview.
- Keep an editable project and check the final PNG before import.
Start Your Tesla Wrap Design with the Right Template
Use the template for the exact vehicle you want to depict. Tesla's official custom-wrap repository publishes separate vehicle entries, including Model Y 2025+ Standard, Premium and Performance. A shared model name or image size does not establish that two files use the same layout.
Save an untouched copy of the official template and record its folder identifier with your working project. That identifier is more useful than an informal filename such as "my Model Y design" when you return to the artwork later.
Our Tesla wrap template guide explains the Model Y variants and the rectangular Cybertruck canvas. Preserve the chosen template's dimensions rather than stretching every model into a common square.
A template is a flat map for the vehicle's digital surface. Regions next to each other in the image may represent separate body panels, while panels that meet on the car may be far apart on the canvas. Plan artwork around that mapping instead of treating the PNG as a conventional poster.
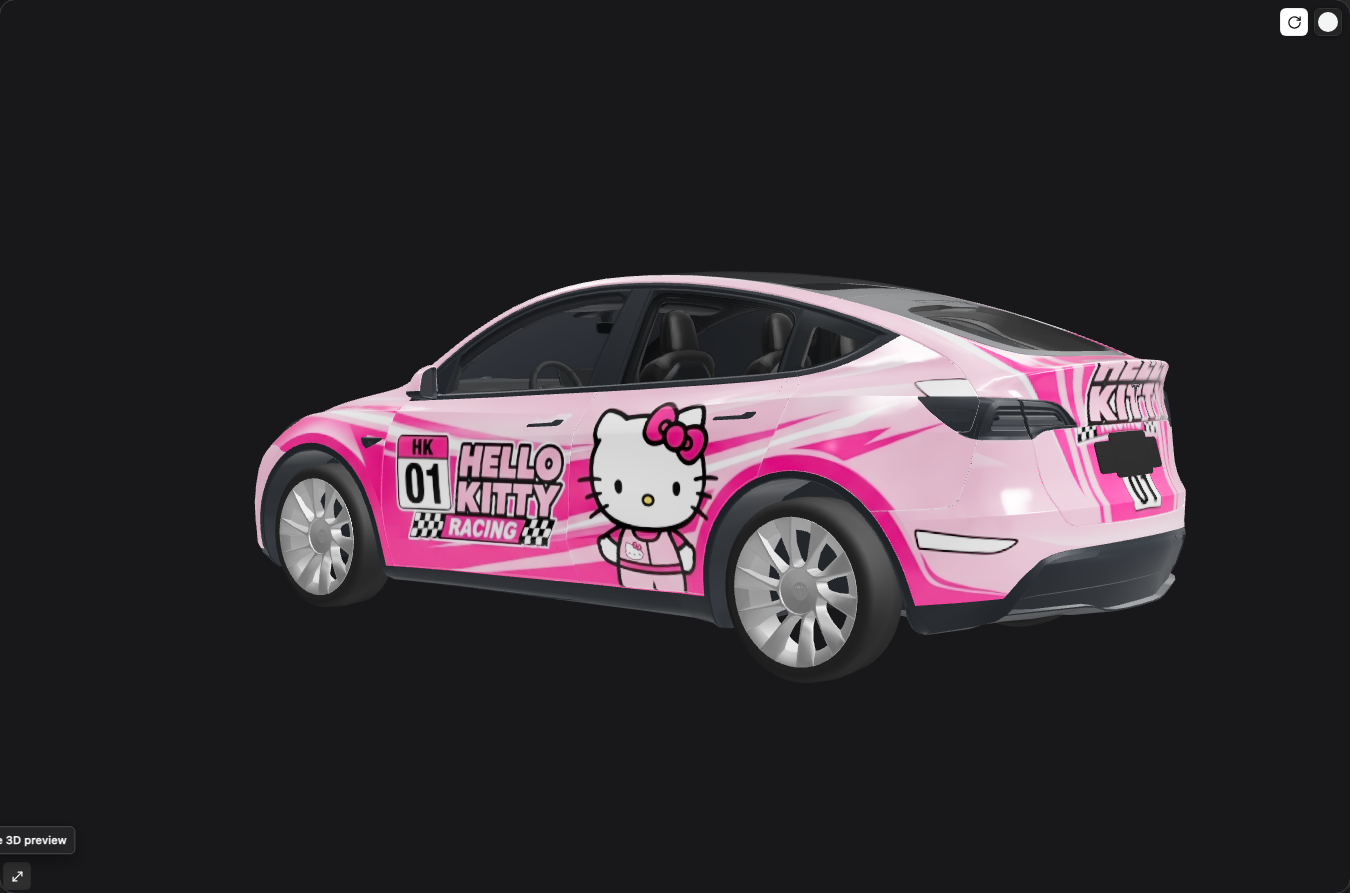
The opening image is a screenshot of an existing pink Model Y wrap loaded in our actual 3D editor. In this rear three-quarter view, the side lettering, character graphic and stripes are visible on the body. The gallery record credits the design to melissa madsen. This view shows the rendered design, but does not establish how its opposite side looks or prove a vehicle import.
Choose a Clear Direction Before Adding Detail
Decide what should stand out: the overall body color, a side graphic, a stripe, or a contrasting panel. Give one element the lead and let the remaining elements support it. This is a design recommendation, not a measured rule about which style performs best.
Write a short brief before opening more layers. For example, a proposed design could use a teal body color, a pale side graphic and a single dark accent. That is a planning example, not a pictured or tested result. It gives you a concrete basis for deciding whether another shape belongs in the composition.
Use the design gallery to compare directions, then verify the vehicle information for any file you intend to reuse. A reference can inform color and placement without being a compatible upload for your vehicle. Our Model Y wrap ideas offer more specific composition suggestions when that is your target model.
Build the Base Color and Main Shapes First
Work from the largest elements to the smallest. Fill the intended body regions, position the main graphic, then inspect how the design reads from the front, side and rear. Add detail only after the major placement decisions make sense.
| Design layer | What to decide | What to inspect |
|---|---|---|
| Base color | The dominant color across the body | Unintended gaps in the intended painted regions |
| Main graphic | Its location, scale and direction | Placement on the correct panels |
| Accent | Where contrast helps the composition | Whether it competes with the main graphic |
| Lettering | Its location and orientation | Readability on both sides |
| Fine texture | Whether it adds useful detail | Its appearance in the final export |
Keep these elements on separate editable layers when your editor supports them. You can then move a stripe without repainting the base color or simplify a texture without rebuilding the entire design.
If you adapt artwork created for another model, reuse the concept rather than assuming the placement will transfer. A motif and palette can carry over; mapped panel positions need to be checked for the new template.
Use a 3D Preview to Check the Whole Design
Use a preview model that matches your template and inspect a consistent set of views: left side, right side, front, rear and overhead. Compare the same views after each substantial change so a camera-angle difference does not distract from the edit.
Check the large shapes first. Is the main graphic on the intended panel? Does its scale still make sense on a curved surface? Does the opposite side use the intended orientation? If a region appears somewhere unexpected, verify the template and preview pairing before moving more artwork.
Community requests for UV mapping metadata and 3D models, recorded in our repository audit, explain why third-party previews need careful mapping. These discussions are not an official specification for every panel, and a browser preview does not certify vehicle compatibility.
Refine Stripes, Panel Seams and Lettering
Treat a cross-panel stripe as separate mapped sections that need to meet visually. Adjust their height, width and direction at the shared boundary in the 3D view. A line that is continuous across the flat PNG does not necessarily continue across the doors.
If the mapping is unclear, use a copy of the working project with temporary colored regions and an asymmetric arrow. Locate those marks in the preview, then return to the final artwork once you understand their position and orientation. This is a proposed diagnostic method, not evidence of a completed preview test.
Read lettering on both sides. If one region reverses the text, check that region's orientation before flipping the whole image. Inspect narrow corners and panel edges in the flattened export too. The community request for layered PSD templates reported difficulties with unpainted narrow regions; it does not establish that every pale edge has the same cause.
Simplify a composition when alignment becomes fragile. A graphic contained within a panel, or an intentional break in a stripe, may better suit the mapped layout. There is no need to make every design element span several surfaces.
Export the Tesla Wrap Design as a Checked PNG
Keep the editable project separate from the file you will upload. According to Tesla's official instructions, custom-wrap images must be PNG files no larger than 1 MB, with filenames of no more than 30 characters using letters, numbers, underscores, hyphens or spaces.
Reopen the exported PNG after any optimization. Check its canvas, lettering, main graphic and narrow edges. If the image must be simplified to meet the file-size limit, revise a copy of the editable project and export again rather than repeatedly editing a flattened file.
Use our Paint Shop import checklist for the app and USB steps. A file that never appears needs file and import checks; a visible design with misplaced artwork needs a layout check.
Compare the Imported Design When Paint Shop Is Available
When the feature is available for your vehicle, compare the same exported PNG in Paint Shop with your browser preview. Record the vehicle variant and comparable views if the appearance differs. Do not assume that a browser material setting carries into the car's visualization.
A PNG contains image data; it does not encode the preview renderer's roughness or metallic controls. Lighting and reflective appearance can therefore differ. The file also changes the digital visualization, not the vehicle's physical paint.
Keep the project, template identifier and export together so the next revision starts from a known design. Start your Tesla wrap design in the studio with the matching vehicle template, then build and inspect the main shapes before adding fine detail.
Sources and Method
The official Tesla custom-wrap README was checked on October 4, 2026 for template entries and file requirements. Community issues cited above were identified in our July 24, 2026 repository audit; their current resolution status was not independently rechecked.
Composition, layer order and preview inspection are editorial recommendations. No real-vehicle import, controlled visual comparison or universal compatibility test is claimed. This article uses no generated illustrations or schematic images as evidence.
Image source: our local running editor, captured October 4, 2026 from the actual 3D preview at 1350 by 893 pixels. Vehicle and template identifier: modely. Gallery design: pink-kitty, remote record 0f175947-7656-42ad-9008-6d4a013b6a05, credited to melissa madsen. The existing texture was loaded without modification; no new artwork was generated. The original texture's creation method was not independently verified.